A shopping experience group inside eBay conducted a year and a half long research through 1.5 Billion eBay listing views, 300+ hours of focus groups and interviews with both buyers and sellers.
Their findings showed that social proof and trust indicators are crucial for a buying decision.
This blog post will provide a step by step tutorial by Etienne on how to add trust to your eBay listings with eBya feedback widget your can create in minutes!
I will focus on the steps I have taken to put together the Customer feedback Panel below. It is created right inside of CrazyLister. If you follow the steps laid out, it will only take you minutes to put together your own, and I can tell you from experience, it can have a profound impact on your sales.

ebay feedback widget you can create in minutes with crazylister
Just before we get started, I’d like to give you a little background into why I know this panel is a must have addition to any listing template.
I’m sure I don’t have to tell you how important online reviews are in our decision making process. We all use them daily; from browsing Netflix for a good show to chill out to in the evening; to finding the perfect restaurant for date night. Of course, we use reviews when deciding what to buy and who to buy from online.
According to a survey by BrightLocal, the numbers of online consumers who read and trust online reviews is increasing. A whopping 88% of consumers trust online reviews as much as personal recommendations. Now that’s an eye-opening statistic!
A buyer could click through to your eBay feedback page and search through to find the relevant feedback for the product they’re interested in, but that’s pretty unlikely and might even take them away from your listing.
How Increase Sales Using eBay Feedback Widget
I usually place visually appealing, genuine, relevant eBay feedback inside of the template, exactly where it can have the most impact.
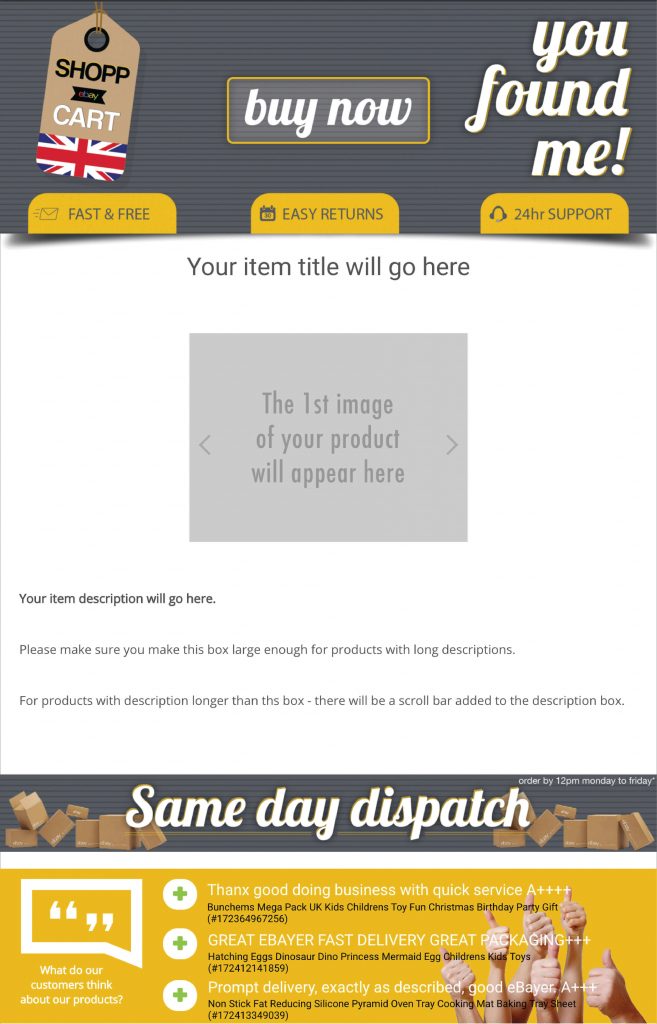
CrazyLister listing template with feedback widget
Your prospective buyers will arrive at your listing, see a great header image design with a professional logo, followed by your image gallery and a well written description of course. Then ‘boom’!, genuine, relevant eBay feedback from happy customers. I know what you’re thinking, sounds like a winning formula!
Ok, that’s enough suspense, let me show you how it’s done.
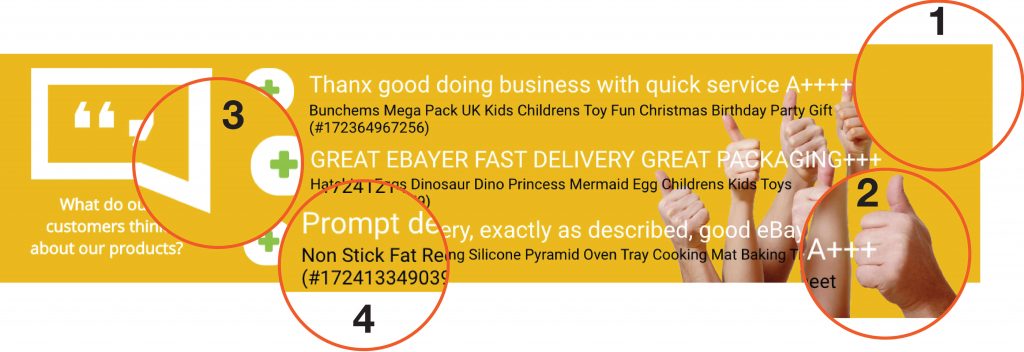
Building eBay feedback widget in listings
Made up of 4 components:
- Shape sized to the width of the template (850px in this example).
- Image with the background removed.
- An icon which supports the content of the panel.
- Genuine ebay feedback taken from your ebay account.
Step by step – how to build your eBay feedback widget
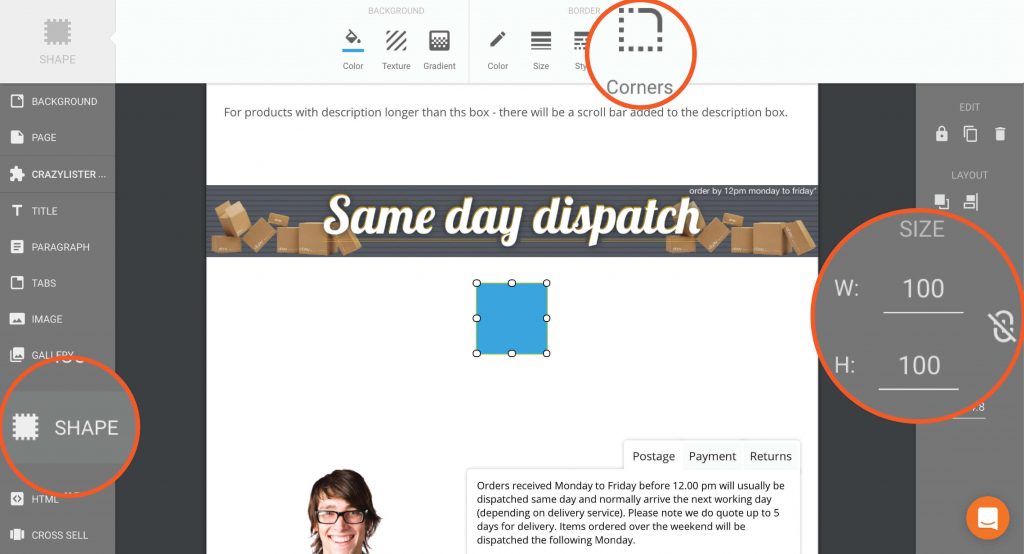
- Select the SHAPE widget from the left toolbar.
- Adjust the corner radius to zero for a rectangle panel.
- Adjust the size to fit the full width of your template and the appropriate height. Input manually from the toolbar to the right. (850 x 200px) in this example.
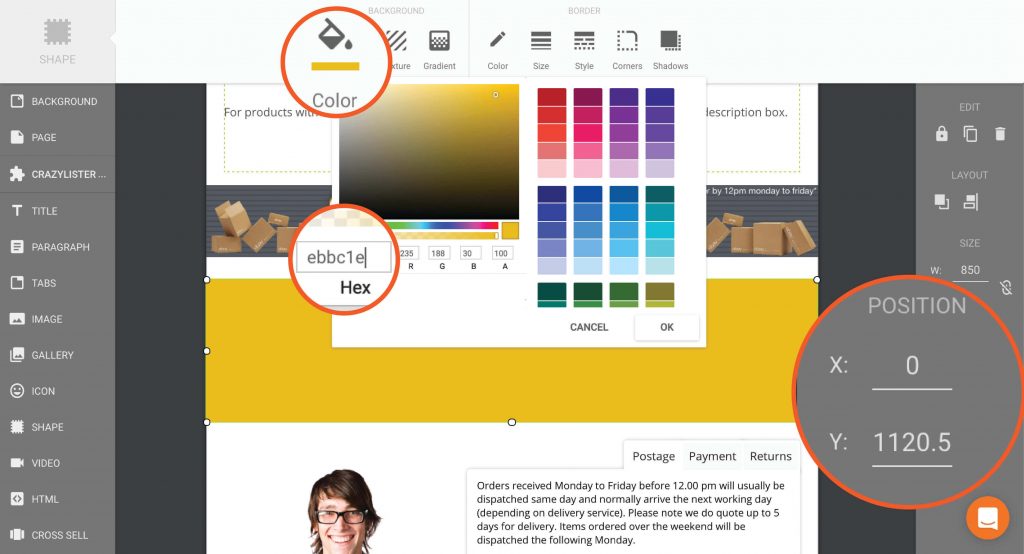
CrazyLister – select color for ebay feedback widget
- With your panel correctly sized, select the desired colour from the top toolbar.
- From the POSITION in the right hand toolbar you can, accurately place your panel.
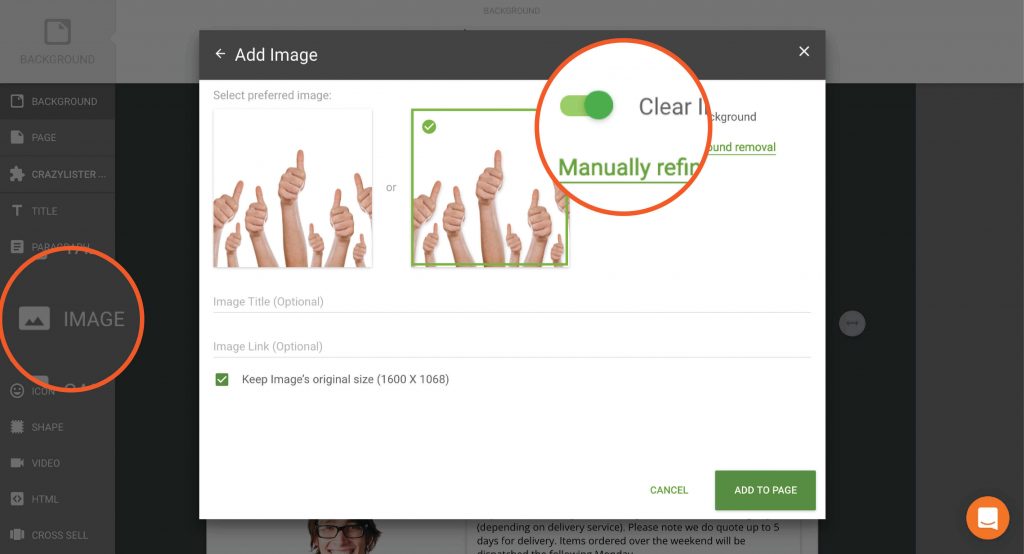
- Select the IMAGE widget from the left toolbar.
- Upload your image (if your image is not transparent, its background removed) Use CrazyLister’s built in tool or any photo editing software like Photoshop to remove the background.
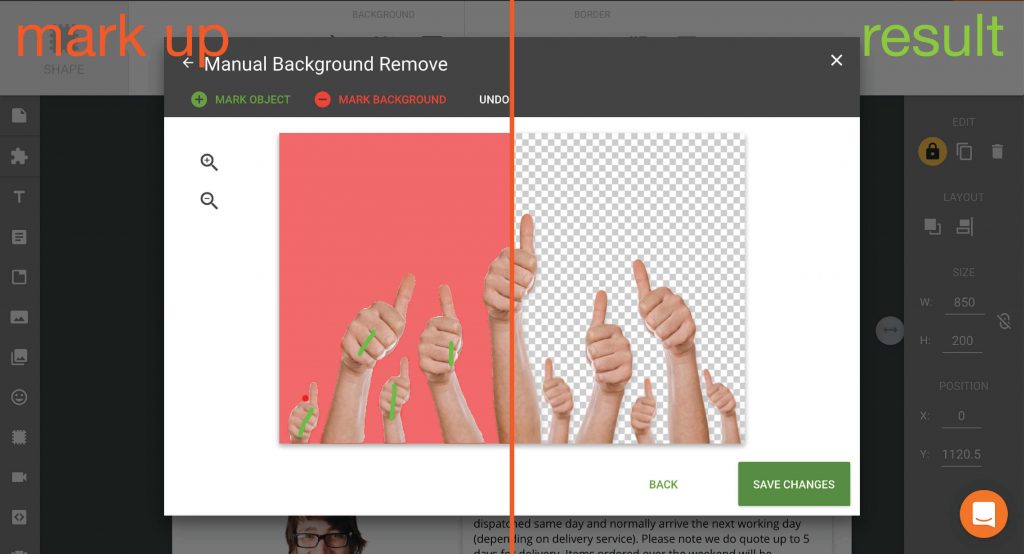
If required you can use the MANUAL BACKGROUND REMOVE tool to adjust what is removed and what is shown by manually marking the object/background.
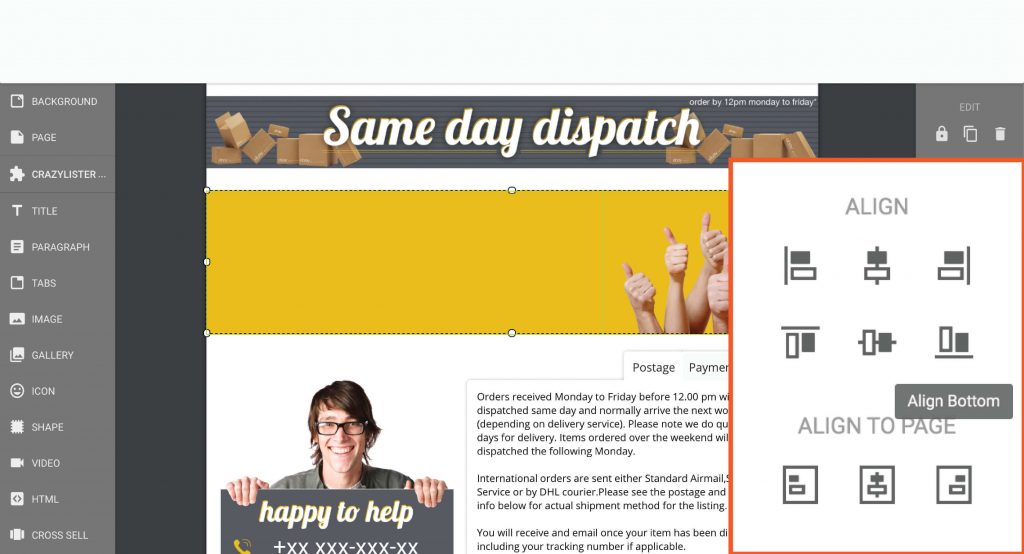
CrazyLister – align elements
- Place your image and resize as required.
- Select the ALIGN tool from the right toolbar and easily line up your image to the panel.
- By holding CTRL and selecting both the panel and your image you can align the two elements to each other. When selected individually, it will alight the element to the template bounds.
CrazyLister – select icon
- Select the ICON widget from the left toolbar (in this example, I have selected an icon from the CHATTING folder).
- Add to your template and resize and position as required.
- Select the PARAGRAPH widget from the right toolbar to add text below your icon.
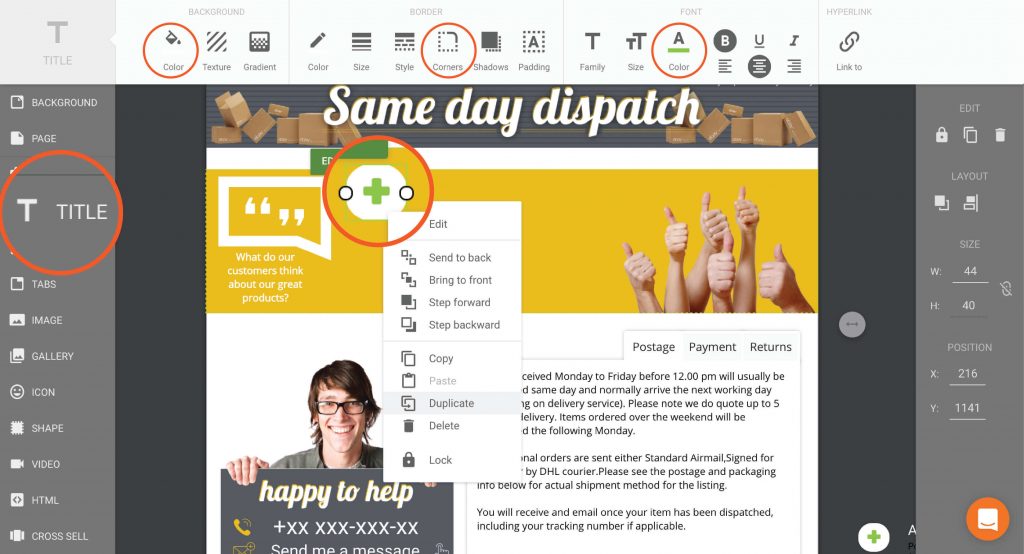
CrazyLister – add title to your eBay feedback widget
- Select the TITLE widget from the left toolbar to add the ‘+’ sign.
- From the BACKGROUND toolbar at the top, choose white to fill the space around the ‘+’ sign.
- From the BORDER toolbar at the top, adjust the CORNER radius to create a circular background fill.
- From the FONT toolbar at the top I choose a green to represent positive feedback.
- RIGHT CLICK your icon and select DUPLICATE from the dropdown to create as many duplicates as you need (I have chosen three)
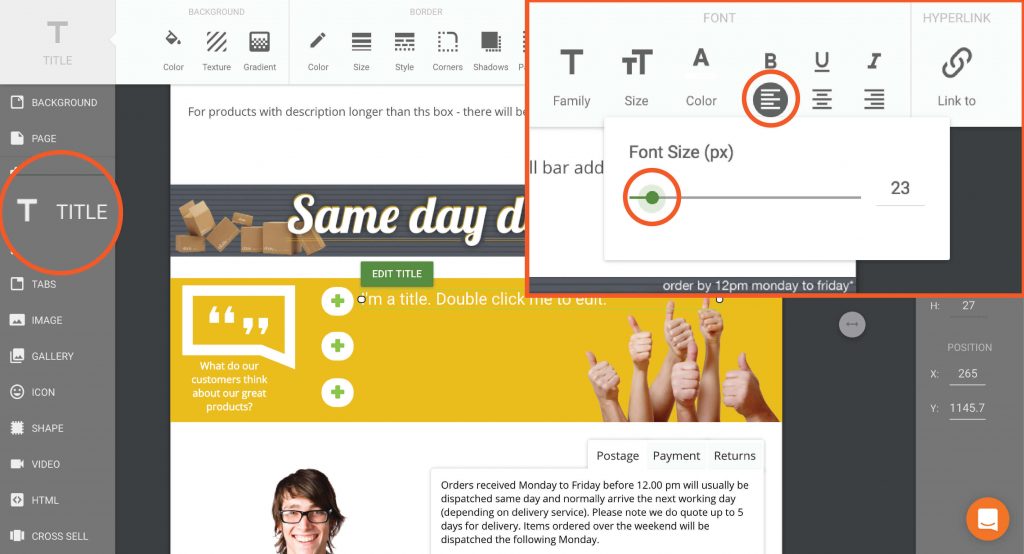
CrazyLister – select font
- Select the TITLE widget from the left toolbar to create the text where you will place your feedback and product description.
- From the FONT toolbar at the top adjust the size of the text.
- From the same FONT toolbar, adjust the text alignment to the left.
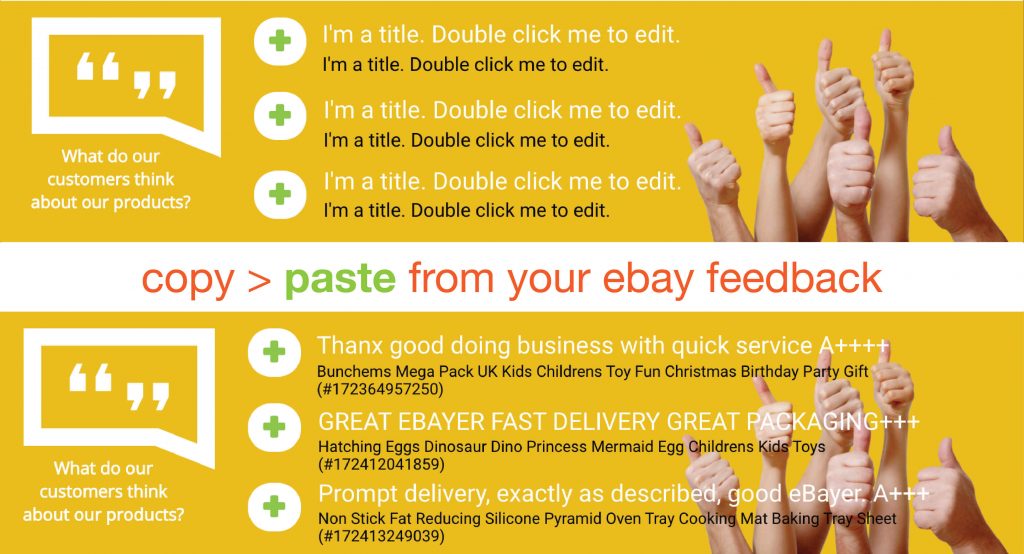
CrazyLister – copy your eBay feedbacks from eBay
- RIGHT CLICK the text to create as many duplicates as required.
- In this example I have six sets of duplicates in two sizes and two colours (white for your feedback and black for the product description).
- Switch over to the feedback section in your ebay account and copy/paste your feedback into the text place holders you have just created.
Let’s take a look at a few variations so that you can choose the method that works best for your own template.

ebay feedback widget variation
In this example, I have simply changed the color of the shape to suit a different colour scheme.

ebay feedback widget variation #2
In this example I have switched the image to a baby to better represent the category of products it represents. (baby store for example).
To finish off, I would like to give you another great tip.
There are two types of feedback you can use:
- Non specific feedback
- Product specific feedback
Non specific: Say you’re just starting out and do not have much feedback. That should not stop you from putting together a more general feedback panel to showcase the feedback relating to a great service for various different products.

general ebay feedback widget
Product Specific: Ok, so one of your products is really standing out from the crowd, you are making sales and have received a good number of feedback comments related to the functionality/quality of one specific product. These kinds of reviews are fantastic and will be sure to turn your browsers into buyers!

product specific ebay feedback widget
Now it’s your turn.
Now you have the knowledge and tools to make it happen. Commit and give your listing template the competitive edge it needs!
I have complete faith in you. However, if you do find you need help creating a professional logo or template design for your business, I’m here to help.
Happy listing!
Etienne Amion is the founder of Studio8ight (Professional graphic design services for e-commerce and eBay businesses). Based in London, UK.
The only thing I love more than e-commerce is great design.


